
Create & publish your store
Create a 0%-commission online store in minutes — pick a template, name it, publish free on a sitesplaced.com address, and share the link.
Last updated 23 August 2026
Creating a store takes about two minutes: press New Site on your Dashboard, choose Ecommerce Store, give it a name and a link, pick a template, and you are in the store dashboard. Publishing is one more click and costs nothing. There is no commission on your sales, no limit on products or orders, online UPI and card payments through Razorpay are included, and the storefront works on phones out of the box. You only pay if you later want your own domain, the SitesPlaced badge removed, AI-written copy or analytics — see Free vs premium store.
Create your store
- 1Sign in at sitesplaced.com and open your Dashboard. If you are new, see Create your account first.
- 2Click New Site (on an empty account the button says Create Your First Site). A box asks What do you want to create? — choose Ecommerce Store.
- 3On the Create Your Store step, enter a Store Name (what customers see) and a Slug — the part before
.sitesplaced.sitein your free address. Slugs can only contain lowercase letters, numbers and dashes; anything else is removed as you type. - 4On Choose a Template, pick the storefront design that fits what you sell — there is one for clothing, shoes, jewellery, home decor, furniture, gifts, pet supplies, groceries and consultations, among others, plus a General Store that suits anything. Every template is free. Choose a store template lists them all and says which fits what, and the templates page shows each one as a live shop.
- 5On Describe Your Business, you can type a line or two about what you sell and who buys it, then press Generate & Create to have starter copy written for your sections. Or leave it empty and press Create Store to start with the template's own text.
- 6Wait a few seconds for the is ready screen, then press Open Store. The store dashboard opens on the Home tab.
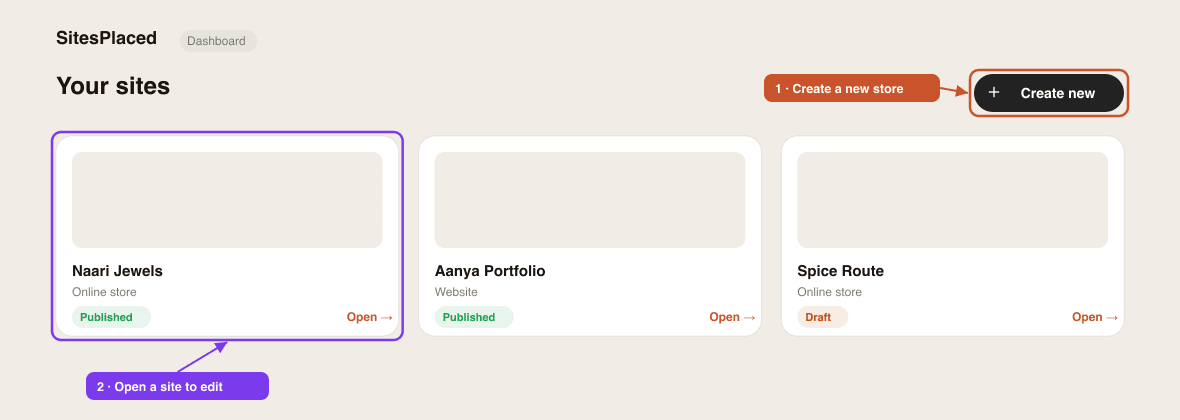
Back on your main Dashboard the store appears as a card with a Draft label and a Manage Store button. A free account can hold up to 5 sites, stores and websites combined.
Already selling on Instagram or another site?
Use the Importer to turn an Instagram profile, an existing website, a product PDF or another store platform into a ready-made store — template, colours and products auto-filled. Everything is editable afterwards. The step-by-step is in Import your existing store.
Picking a slug and a template
Your slug becomes your store's address, so keep it short and brandable — minnajewels, not minna-jewels-official-store. If you see Slug is already taken, someone else has it; try a variation. You can change the slug later under Settings → Store details → Store link, but that changes the address you have already shared, so settle on it early. A custom domain such as yourbrand.com can replace it on the Starter or Growth plan.
Your template decides the layout and the set of sections available on your pages. Colours, fonts, logo, copy and section order are all yours to change afterwards, but the template itself is fixed once the store exists — the Active template card under Settings → Branding explains that switching would wipe your section content. If you want to try a different template, create a second store with it. Choose a store template helps you pick the right one the first time.
Set up before you launch
Three short steps make everything that follows easier:
- 1Set up your catalog — tell the store how your products are priced and whether you track stock. Most sellers can leave the defaults, but it takes a minute to check.
- 2Add your products — at least one, so there is something to buy. On a phone, the bar above the tab bar says Add a product to open your store until you do.
- 3Open Settings → Store details and enter your WhatsApp number with the country code (for example
919999999999). It powers WhatsApp checkout and the WhatsApp links on your storefront. Check the Currency card while you are there.
Publish & share
When you are happy, press Publish — top-right of the dashboard on desktop, or under More (and on the Ready to go live bar) on a phone. Your store goes live instantly at your free address, yourslug.sitesplaced.site, with a small Powered by SitesPlaced badge on the storefront. A success screen shows the link, share buttons and a QR code.
Share that link anywhere your customers are — WhatsApp broadcast lists, your Instagram bio, stories, and the printable QR code from the Store QR code card on the Home tab. Click Open Store to preview the live storefront yourself. The publishing guide covers sharing in more depth.
Want your own domain?
You can connect a custom domain like yourbrand.com on the Starter or Growth plan — see Connect a custom domain. Until then, your .sitesplaced.site address is a perfectly good link to share.
Good to know & troubleshooting
- The Next button is greyed out on the name step — both Store Name and Slug must be filled in.
- I typed capitals or spaces in the slug and they vanished — that is expected. Only
a-z,0-9and-are allowed. - I picked the wrong template — create a new store with the right one and delete the other from your Dashboard. Products do not move between stores automatically, so do this before you add your catalogue.
- Publish is greyed out or fails — check you are signed in to the account that owns the store and try again. If the error mentions your plan, your account has hit its site limit; contact support from the help centre.
- The store is live but the link shows an old version — storefront pages are cached for a short time. Wait a minute and reload.
- Is my store found on Google? — yes, once published. Set a title and description under Settings → SEO & sharing; see Store SEO.
Next: design your storefront, set up your menu, and decide how customers order in Checkout. When you think you are ready, run the go-live checklist.
Is creating and publishing a store really free?
Yes. Building and publishing cost ₹0, with unlimited products and orders and 0% commission. The free plan includes Razorpay, COD and WhatsApp checkout, Shiprocket and Shipmozo, 500 MB of storage and a small SitesPlaced badge. Paid plans add a custom domain, badge removal, AI copy and analytics — see the pricing page.
Can I change the store name or link later?
Yes. Both live under Settings → Store details. Changing the Store link changes your address, so update any bio links and printed QR codes afterwards.
How many stores can I create?
A free account can hold up to 5 sites — stores and websites combined. Each store has its own products, orders, settings and address.
Do I have to add products before publishing?
No, but there is nothing to buy until you do. The normal order is: catalog setup, at least one product, then Publish. Branding, policies and discounts can be tuned after you are live.
Can I switch templates later?
No. The template is fixed when the store is created because switching would erase your section content. You can recolour, restyle and rewrite every section of the template you have, or create a new store with a different template.
Related articles
Didn't find what you needed? Ask an AI assistant about this guide. It answers in seconds.