
Add & manage products
Add products with photos, prices, sale prices, variants, stock and categories — and edit, duplicate, quick-edit or delete them anytime.
Last updated 23 August 2026
You add and manage everything you sell from the Products tab: press + Add Product, fill in a name, price and photos, add sizes or colours if the product comes in options, and press Save product. Products are unlimited on every plan and appear on your storefront the moment they are saved (once the store is published). Do Set up your catalog first so the form asks for exactly what you need.
Add a product
- 1Go to Products and click + Add Product (on a phone, the floating bar also offers Add product while your store is a draft).
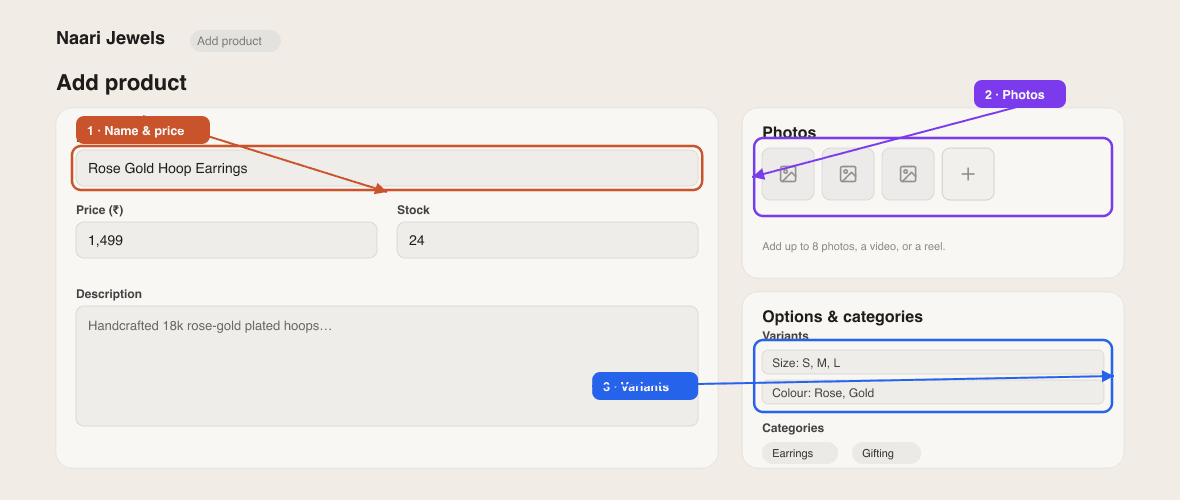
- 2In Product info, enter a Product name (the only required field) and a Price in your store currency.
- 3Optionally set an Original price — a higher "was" price. Your live price then shows with the original struck through, so customers see the saving.
- 4Pick one or more Categories from your list, or type a new one to create it. The first one is the product's main category. See Categories & collections.
- 5Add an Item code (SKU) if you use one, and a Stock count if you track inventory — leave it blank for unlimited.
- 6Upload Photos — pick several at once, up to 5 MB each. The first photo is the cover; drag photos or use the ← → arrows to reorder, and the × to remove. Add Image alt text under each photo if you want to describe it for Google Images and screen readers.
- 7Write a Description — what it is, what it is made of, how to care for it, delivery time. This is the text customers read before they buy.
- 8If the product comes in choices, open Options and add them — see Options & variants below.
- 9Press Save product, or Save & add another to stay on a fresh form. You will see Product added and the product is live on a published store straight away.
Options & variants (sizes, colours, weights)
Open the Options card and press + Add an option. Give it a name (Size, Colour) and type each choice followed by Enter (S, M, L). If you saved default options in your catalog setup, they appear as one-tap buttons such as + Size (S, M, L, XL). Then press Create N combinations to build every size-and-colour row at once, or + Add one manually to add a single row.
What each row can carry depends on your catalog setup. With Different price per option every row gets its own Price; with Stock per option every row gets its own Stock. Every row has a Photo cell — tap it and choose one of the product's photos or upload a new one, and the product page jumps to that photo when a customer picks that option. Remove any combination you do not sell with the × on its row.
Two shortcuts live in this card. Apply to all products adds the options you have just typed to every product that does not already have its own — useful after an import. And if your store tracks one shared stock count, a Track stock for each option? prompt appears with a Track stock per option button; it switches the whole store to per-option stock in one tap.
Optional cards on the form
- Custom photo upload — tick Customers upload their own photo for this product for printed gifts, mugs, frames and t-shirts. Write Instructions for the customer; the photo travels with the order so you can print it.
- Product badges — tap presets like Premium Quality, Free Shipping, Cash on Delivery, Handmade or Made in India, or add a Custom badge with its own icon and text — up to 8 per product. They show on the product page.
- Video & Instagram — paste a Video link (YouTube, Vimeo, Google Drive, Loom or a direct link) or Upload a video up to 50 MB, and paste an Instagram Reel link. Both show on the product page.
- Size chart / info popup — upload an image (up to 5 MB) and set the Link label (Size Chart, Usage Guide). Customers tap the link on the product page to open it.
- Attributes — values for any extra details you defined in the catalog (material, occasion, warranty). Separate several values with commas.
- Search & SEO — a Meta description of up to 160 characters, used as the Google and WhatsApp preview text for this product's page.
Manage your product list
Back on the Products tab you can:
- Search by name, item code or description with the search box, and filter with the All categories dropdown.
- Spot low stock at a glance — a Low stock: N button appears when any tracked product has 5 or fewer units; tap it to show only those.
- Switch between Cards and Table views on desktop (phones always show cards).
- In Table view, quick-edit a price or stock count — click the value, type, and press Enter or click away to save.
- Click a product to edit it. The edit form has a Duplicate button at the top (you land on the copy, ready to rename) and a Delete button in the bottom bar that asks you to tap again to confirm.
- Use the ⋮ menu on any card or row for Duplicate, Copy product link (a direct link to that product page, handy for WhatsApp) and Delete (tap again to delete forever).
Photos look best square or portrait and at least 1000 px wide — SitesPlaced optimises and resizes them automatically. Products are unlimited on every plan; what is capped is upload storage (500 MB on the free plan, 5 GB on Growth).
Good to know & troubleshooting
- Save is refused with *Product name is required* — the name is the only mandatory field; everything else can be added later.
- A product shows *Sold out* — its stock is tracked and at 0 (for a product with options, every option is at 0). Raise the stock or clear the box to make it unlimited. Stock is deducted when a COD, UPI or WhatsApp order is placed, and when a Razorpay payment is confirmed — see Track inventory & stock.
- The sale price is not showing — Original price must be higher than Price; the lower number is what is charged, the higher one is struck through.
- Photo upload fails — check the file is an image under 5 MB. Screenshots and WhatsApp downloads are usually fine; raw camera files can exceed the limit, so resize them first.
- I want to run a discount on many products — use a coupon or a Buy X Get Y offer under Settings → Discounts instead of editing prices one by one. See Discounts & offers.
- Pricing a new product? The product pricing calculator works out a selling price from your cost, packaging and margin.
- Deleted by mistake? Deletion is permanent. Duplicate products you are unsure about before removing the original.
How many products can I add?
As many as you like — products are unlimited on every plan, including free. The only cap is upload storage: 500 MB on the free plan and 5 GB on Growth, which is thousands of optimised photos.
Can I add products in bulk?
Yes. The Importer at sitesplaced.com/import builds products from an Instagram profile, a website, a product PDF or another store platform, and, on the AI Co-founder plan, the SitesPlaced Agents can add products from a chat message. For one-off additions, Save & add another keeps you on the form.
Can one product be in two categories?
Yes. Pick several in the Categories field; the first one is the product's main category. The category filter on your storefront's products page shows the product under every category it belongs to.
How do I share a single product on WhatsApp?
Open the ⋮ menu on the product and choose Copy product link. The link opens the product page directly, with the cover photo and your meta description as the preview.
Do I have to republish after editing a product?
No. On a published store, saved product changes appear immediately. Only the store's draft/live state needs the Publish button.
Related articles
Didn't find what you needed? Ask an AI assistant about this guide. It answers in seconds.